
Hey Prompt Entrepreneur,
Today we’re going to finally start to put together our videos for our online course.
We’ve done a lot of prep to get to this point to make sure that our content is actually good quality.
There’s no point spending time producing videos of crappy content. Therefore we focused on nailing the script first.
I used to produce TV/Film and you definitely want to work out the kinks when it’s pen and paper and not video files! Scripts are a lot easier to work with than video footage believe me!
Let’s get started:
Course recording and editing
1. Choice of production tools
Video production is a HUGE topic.
So I’ve been struggling to break this down into my usual “here’s exactly what to do” approach.
This is make even more true by the fact that I want to balance your time and money input. For some people using paid for tools to produce video will be an efficient use of money. Whereas for others using free tools and putting in more personal work will be the answer.
I’ve debated this! I really have.
Here’s the deal. I’m going to run through the options now and give you one that I’m choosing to detail.
I’ll give you reasons and also more resources to use other tools if you aren’t happy. It’s hard to please everyone here so I’m aiming for the majority!
Options
a) The first method is to record and edit manual.
I’ve done this before, notably on my https://learnchinesecharacters.academy/ videos as well as my early Udemy courses.
The basic steps are:
- make a slide deck from your script in Powerpoint or Keynote
- screen record yourself going through the slides on a webcam using a tool like Loom
- edit using a free editor like iMovie, adding in stock videos and imagery from free sources like Pexels and Stocksnap.io
This is entirely doable and uses free or low price tools.
The main cost is instead your time.
I’ve done this process a few times and creating a video course takes months.
b) Descript
Descript is an amazing tool for recording and editing. It’s a complete suite of tools that can replace all the free versions I mentioned above.
Basically, creating a course in Descript would be the more premium version of the manual approach above. It costs about $12 or $24 dollars a month for the version of Descript you would need.
It still requires lots of work but the tool itself makes each sub-process smoother. You can expect to turn out a course in a couple of weeks.
c) Pictory
Pictory is a new kid on the block and uses AI to produce videos much faster than if you were manually putting them together.
You upload your script and it automatically picks out suitable videos and images, adds written subtitles and generates AI voice over.
It has a free trial to play with and costs $19-39/month for a premium account, depending on how much you need to export.
d) Synthesia
Synthesia is the ”big boy” in AI video generation. It produces high quality corporate style videos, including custom AI avatars who can present your course like a real human being.
The quality of Synthesia is extremely high. As is the price. There’s no free trial and the paid account is ~$30/month for 10 credits. Each credit gets you 1 minute of video! So we’re talking $3/minute. Wowzers.
Which to use?
These are a few of the big options you have.
If you have zero cash to invest into this then the choice is easy – you’ll need to go with the manual free route.
However, we’re Prompt Entrepreneurs. We want to use the best AI tools available to us to get the work done efficiently.
As such this Part of the guide will be focusing on using Pictory.
This will allow you to create your whole course in a matter of days for ~$40, a sum of money that will be quickly recouped once you launch your course.
2. Video first draft
First up head over to Pictory to sign up.
It has a free trial. Yay!
It also doesn’t need a credit card. Double yay!
You can sign up at https://pictory.ai/
Once in you’ll see this:
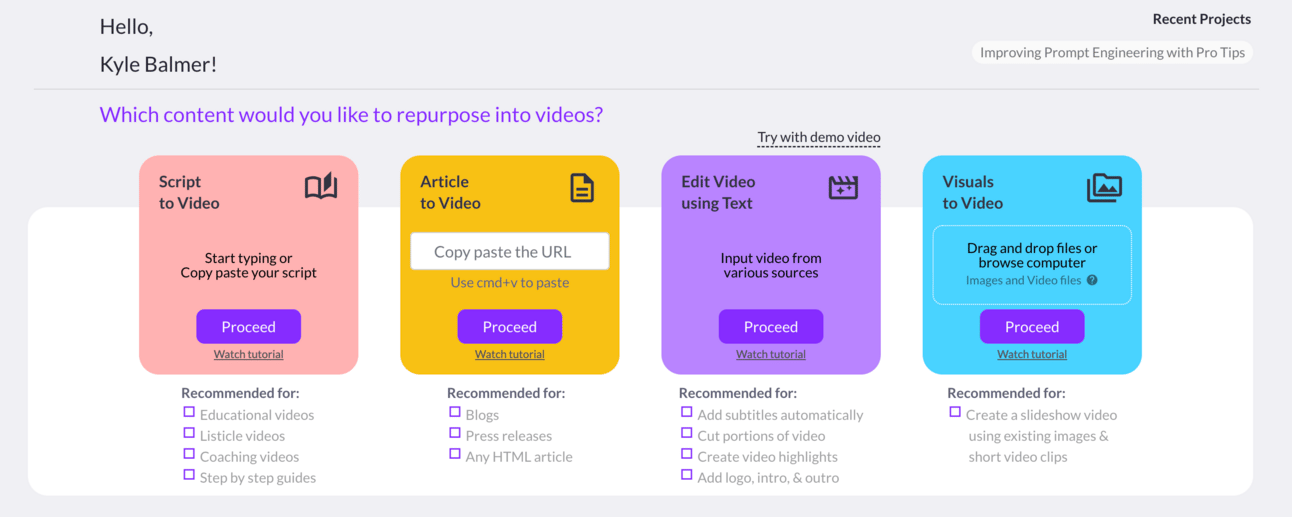
We want to go for Script to Video. Go ahead and click Proceed and you’ll get the script editor.
Here it is with a script that I’ve copy pasted in.
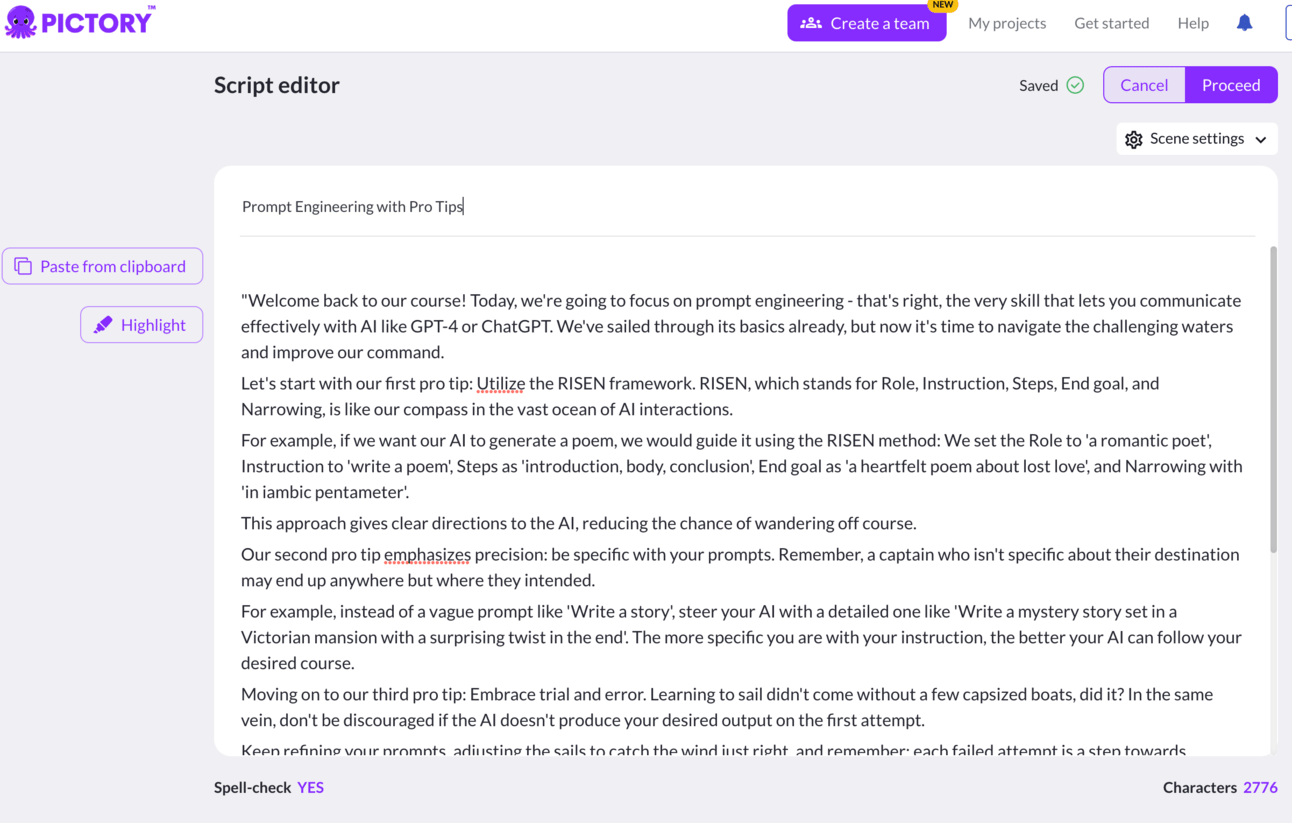
Notice that I’ve stripped the timecodes and description out of the script.
The scripts we have prepared, complete with image suggestions and time codes, are fleshed out enough to be used in any format. The extra detail will be invaluable in manual editing in particular. When using AI tools like Pictory though we’ll just strip that info out quickly.
Go ahead and drop your script into ChatGPT and use the prompt
Give me this script but remove timecodes and images suggestions
Provide spoken script only
Copy this stripped down version of the script into Pictory and hit Proceed.
Next, Pictory will give you a selection of templates. Don’t sweat this too much as we can change it in the editor later. It’s not final so just choose one you like the look of for now.

Pictory will now process the video. It doesn’t take long – less than a minute. Once done it will spit out a first draft:

If you’ve ever manually prepared video content then chances are right now that your mind is blown.
Compared to manually preparing a similar video the speed Pictory works at is phenomenal.
Remember though: this is a first draft.
Like with all AI tools we’re working with the tool. We aren’t totally replacing ourselves.
3. Refining the video
The left sidebar in Pictory gives us access to the tools to refine our video. Take some time to explore the interface.
First we’ll start by switching out images that don’t make sense. Pictory will make a best guess about what videos and images to place in the video but sometimes it gets it wrong or the images are uninteresting.
Here’s an example:
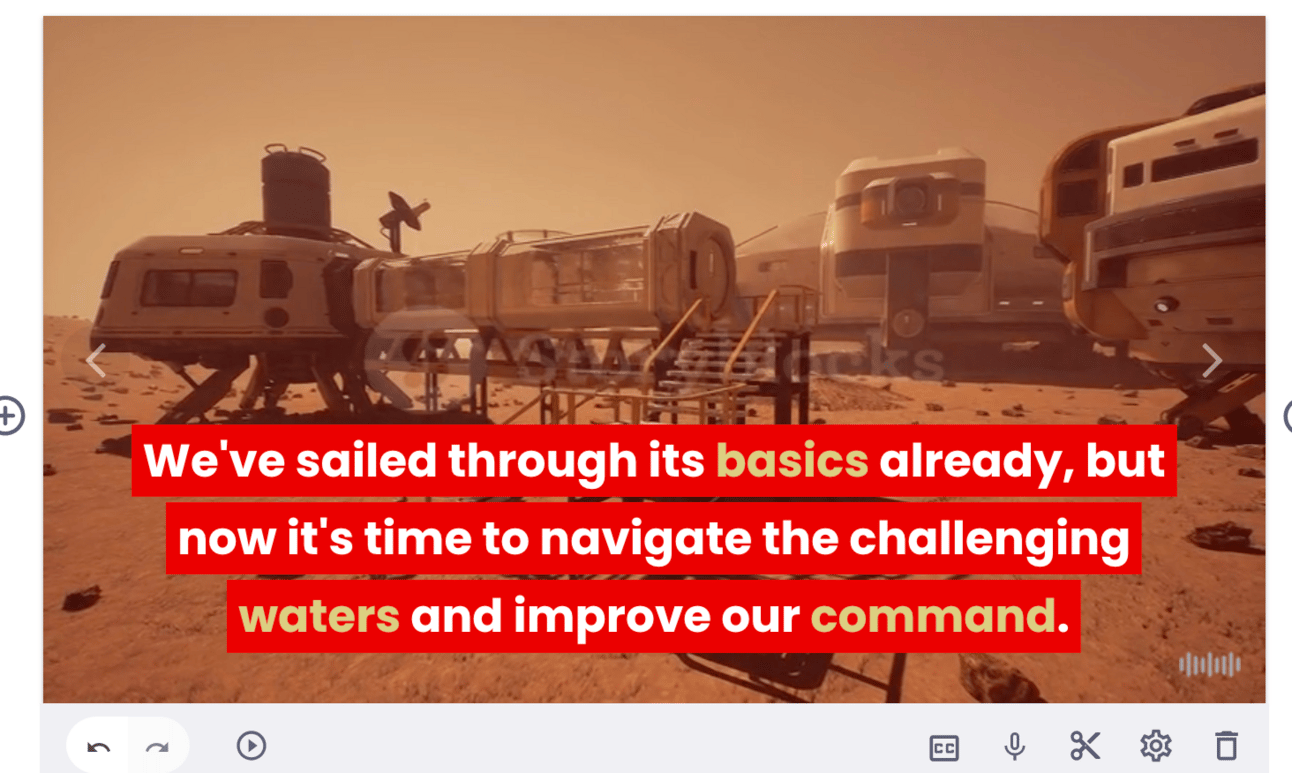
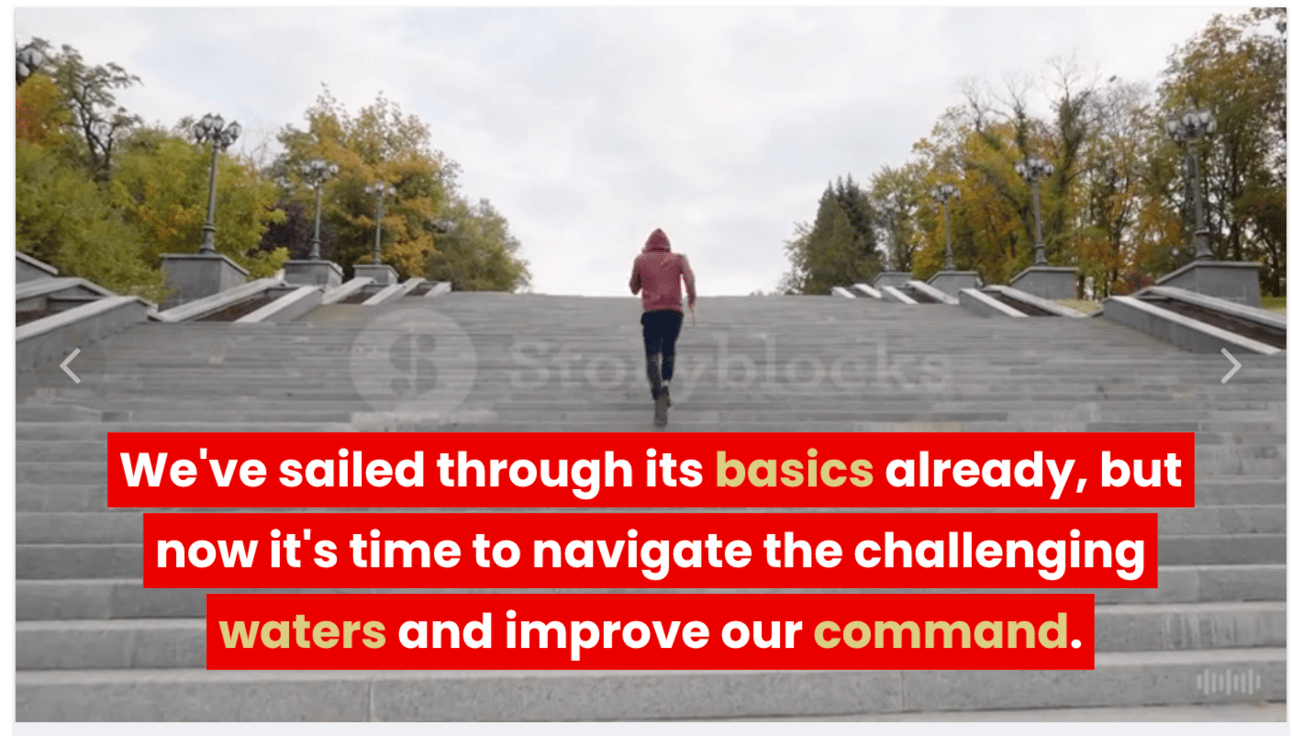
This part of the video is about moving from easy topics to more challenging topics. For some reason Pictory has chosen a video of a Martian space base. Let’s switch that out.
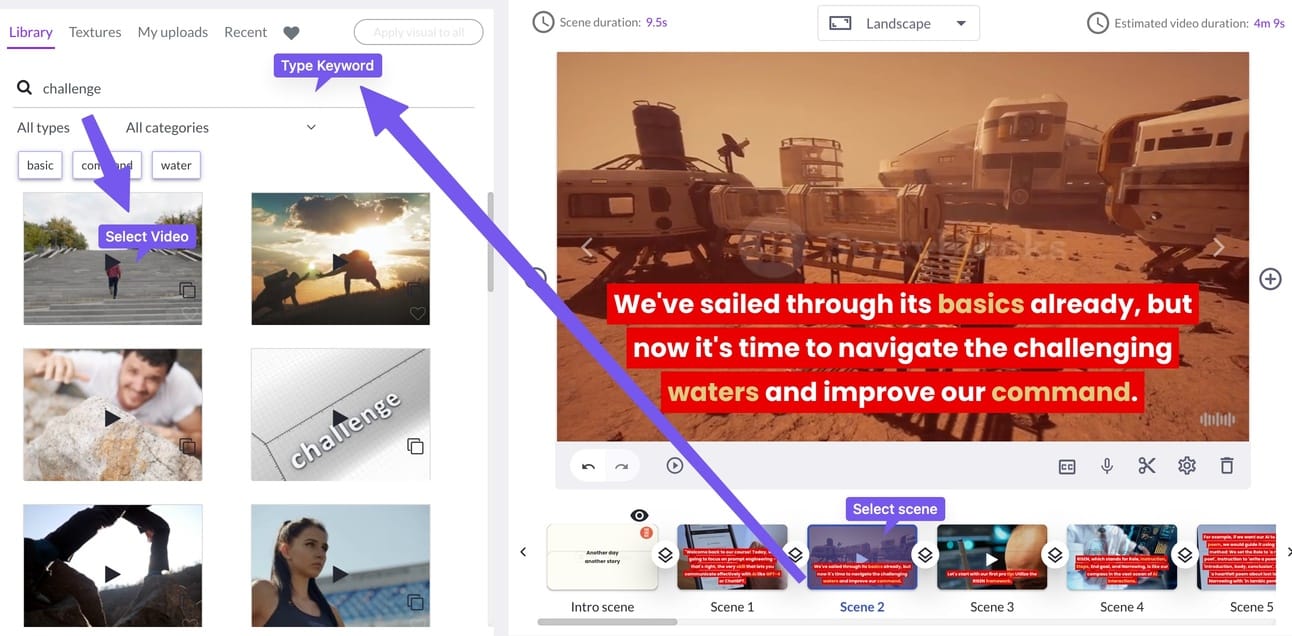
To switch this:
- Select the Scene at the bottom
- Type a keyword in the top left search bar within Library
- Select the video you want to use
This automatically switches the video and cuts the new video to length so it fits in the same Scene.
Do this for each of the Scenes until you are happy with the overall results.
Next up, we want to add a voice over.
It’s decision time now. You can either use one of Pictory’s built in AI voices or record your own narration.
If you have a decent audio setup (a microphone or at least high quality headphones like Airpods) and you are comfortable recording you should.
AI voice-overs save a lot of time but aren’t particularly engaging. They sound like AIs! The technology is improving all the time though.
Test out Pictory’s built in AIs and see what you think. Also record some of your own narration so you can do a comparison.
Here’s how to record narration:
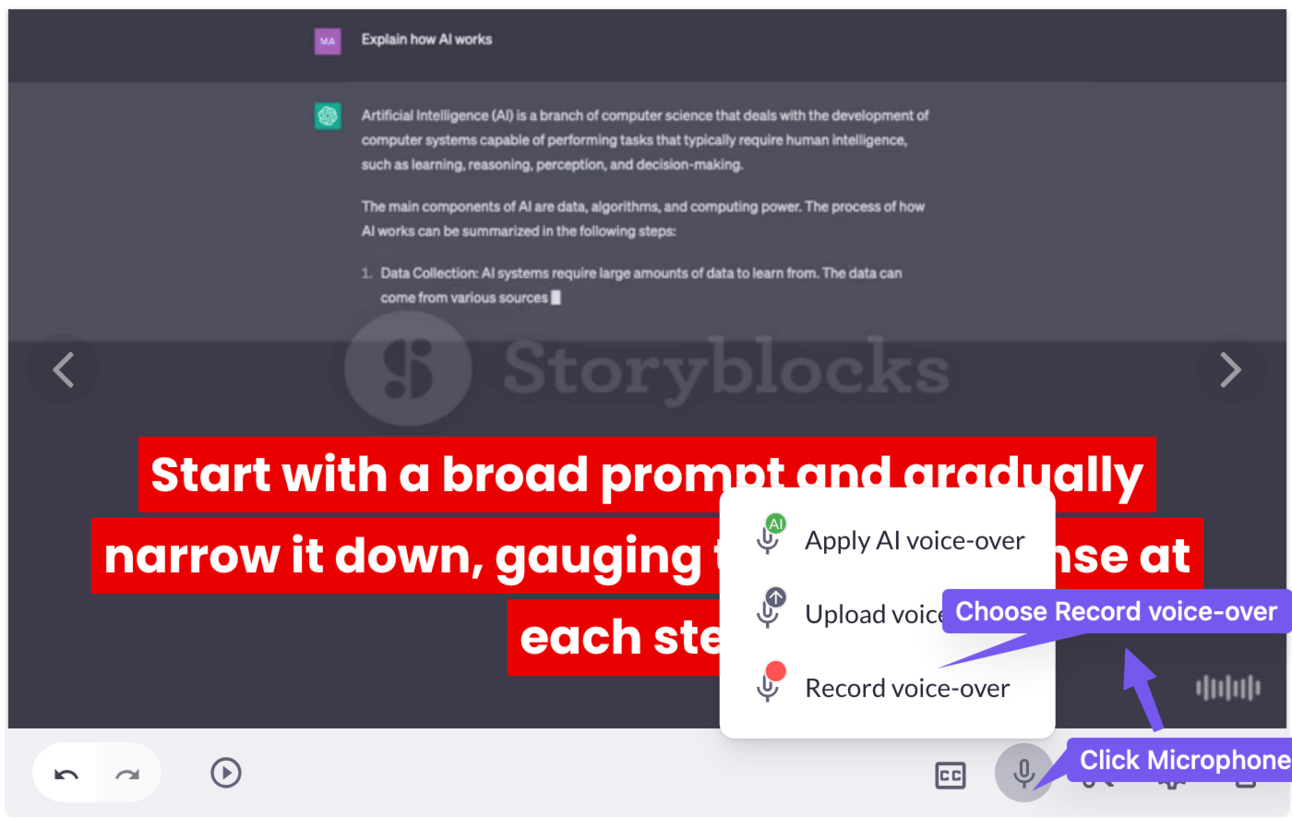
First click the microphone icon at the bottom of a selected Scene. Then choose Record Voice-over.
This will pop up a recording interface where you can record.
Importantly Pictory will match this up with the scene, saving you time trying to synch audio and video. Another massive time saver.
Speaking of sound, you probably have noticed that Pictory has chosen some background music.
If you don’t want any music go to the Audio tab in the left sidebar then Background music. You’ll see one music track has the word “Applied” next to it. To clear that music click the cross (x) to delete.
Alternatively you can replace the music with something more fitting. There are drop downs for selecting mood, purpose, genre and length. You can use these to filter the large music library and find something appropriate.
Generally it helps to have some music in the background and it fills empty space between narration. Just make sure that the volume isn’t overpowering compared to the narration. Pictory does a good job of balancing thankfully.
Finally, some of you might be wanting to add your beautiful faces into the video. There’s a nice simple way to do this. Just record the scene you want to replace using your camera, speaking the part of of the script in that scene. Then replace the visuals in that scene with the video and turn off any AI narration.
Once you’ve got the video customised hit the Preview button. That will show you the results of your work with all the changes applied.
Don’t export just yet though!
4. Branding and export
Before you export your videos it’s helpful to set up branding for your course. This branding will be applied across all your videos so it’s helpful to set this up before you start exporting any videos.
Branding is set up in the left hand sidebar tab Branding. Good name eh?
We specifically want an Intro and Outro.
Keep them extremely short, maybe 1 or 2 seconds tops. These should simply state the title of the lesson and have a quick animation.
For the Intro follow these steps:
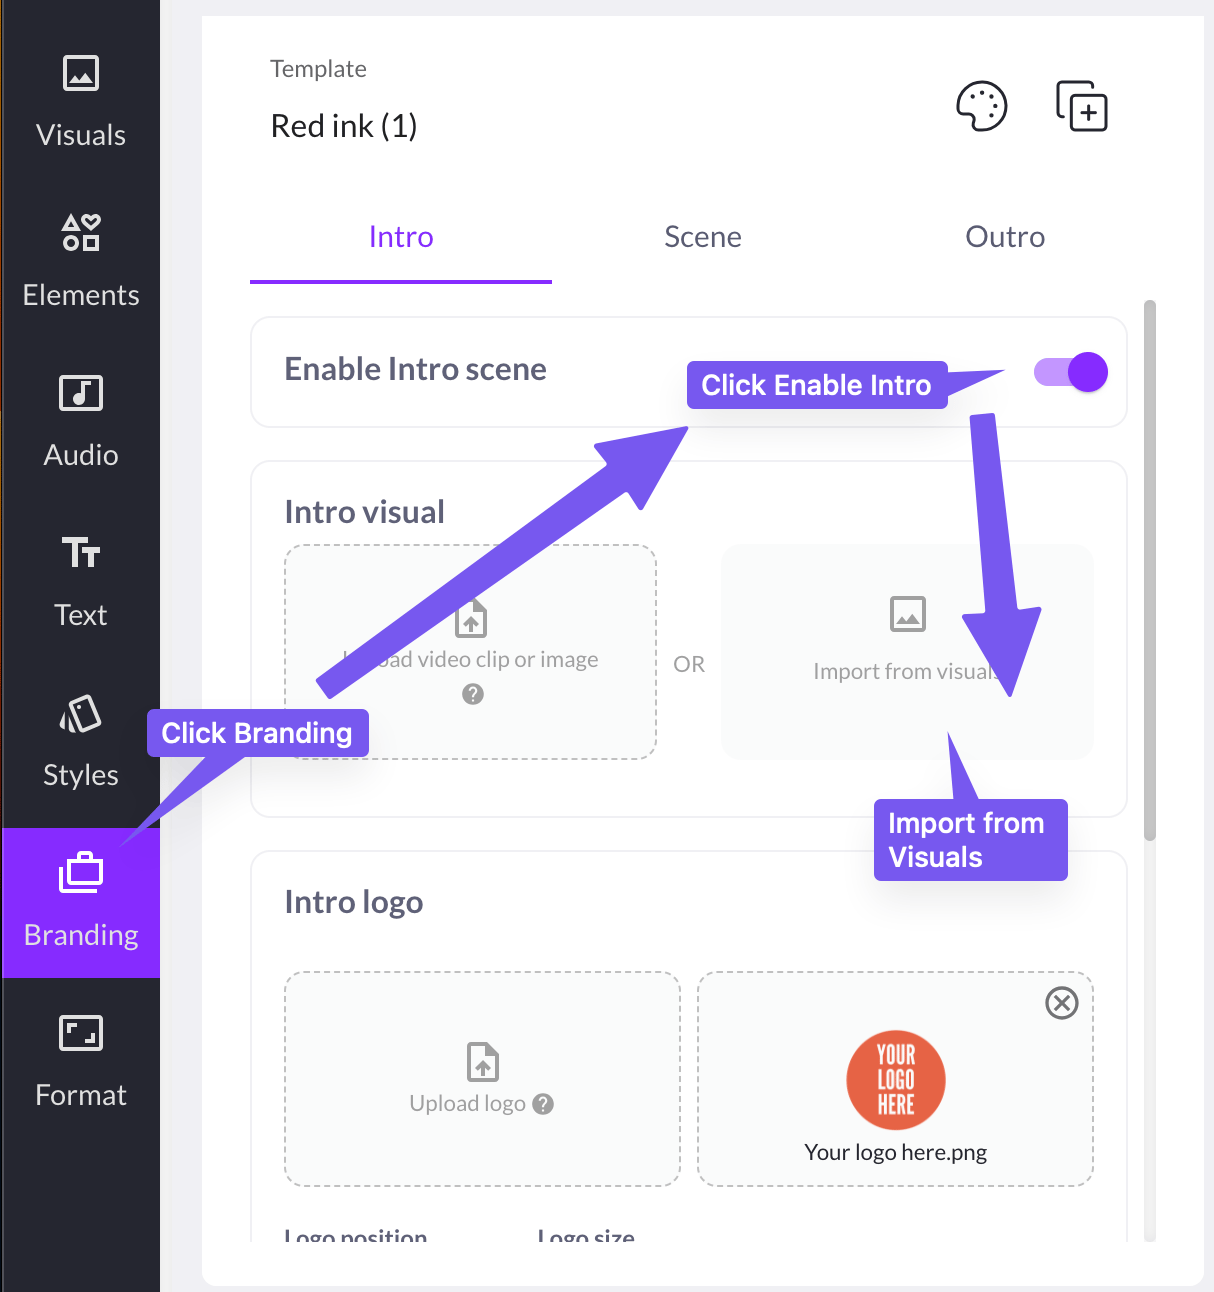
First go to Branding in the left sidebar.
Then Enable Intro toggle on.
There may already be an intro template in place. Delete the default and choose Import from Visuals.
This will take you to the video search we used before to find visuals for our Scene.
Here’s a clever tip: now just search “intro” and you’ll get lots of nice background animations.
Once you’ve found one you like make sure to edit the Title (text is at the bottom) and upload your logo.
Do the same with the Outro but searching “outro” in the search. Or alternatively use the same animation as the intro.
Alternatively you can get intro and outro videos professionally made on Fiverr.com for a reasonable cost. This would be a good investment to increase the quality of your production very cost effectively.
Now go back to the Preview and check the results. Happy? Go ahead and export.
The free version will allow you to export a limited number of projects and they will all have water marks – so you will need a paid version eventually.
Just rest assured that you have saved thousands of dollars in hours by using an efficient tool like this.
Also, if you get all your videos processed in 30 days you only need to pay for one month. Not bad!
Pulling it together
Seems like a lot today.
But considering we covered a topic as complex as video creation this is pretty tight! This topic could have taken up the whole week if we were doing it the old way.
I for one am glad to not have to be making Powerpoint slide decks and screen recording everything in real time. Tools like Pictory make the process much faster – especially if it’s your first time producing a course.
Instead of being a course creator and video producer you can focus on the course itself and let the technical parts be handled by tech.
Production will still take time, especially if you follow the Refinement steps outlined above. But course creation is now in hand and can begin.
We’re moving into the back end of the process now. Tomorrow we look at packaging everything up, getting it published on Udemy and marketing.
This week:
Part 1: Course Topic Selection
Part 2: Course Structure
Part 3: Course Scripts
Part 4: Course recording and editing
Part 5: Course marketing